🏷️ 🛍️ Update: Free Shipping Is Temporarily Unavailable
Simple Ideas for Jewellery Organizing
Ideas to Keep Your Jewellery Organized
- How to Make A Cabinet Hardware Jewellery Hanger
- How to Make A Jewellery Board Organizer
- How to Make a Thread Rack As A Jewellery Organizer
- How to Make A Drawer Jewellery Organizer
- DIY Drawer Jewellery Organizer
- How to Make A Peg Board As A Jewellery Organizer
- How to Make A Over-door Hanger Jewellery Organizer
- DIY Wall Hanger Jewellery Organizer
Have you ever noticed when cleaning and reorganizing your bedroom the last thing to lie around, is usually your jewellery and accessories. There just never seems to be an organized area to place these little treasures.
To top that off, have you noticed how jewellery frequently lands up in a drawer or on a dresser top after being worn? adding to the clutter and disordering?
Well if this is as much an issue for you as it is for me, I would love to share a few exciting Jewellery Organizing tips that I have come across, that are very easy and affordable to make or purchase.
How to Make A Cabinet Hardware Jewellery Hanger
What You Will Need:
- Wallpaper
- Cabinet Hardware such as drawer handles and cupboard knob handles
- Plywood cut 22x22 in size
- Two packets of #8 ¾ inch metal bolts
- A drill and a screwdriver
Steps:
- Cover the Plywood board with wallpaper
- Measure and mark where to drill
- Drill
- Attach the knobs and handles with the metal bolts in the holes

How to Make A Jewellery Board Organizer
What You Will Need:
- Plywood Board around 3/4in x 4ft x 8ft
- Ornate backless frame
- PVC planks, cut into two 32 inch boards
- Optional; Devra Old Pine Straight Molding to cover the planks edges
- Three zinc corner braces
- Curtain rod
- Aluminum sheets with a pattern of your choice
- Wood Glue
- Shower curtain or similar type hooks to hang necklaces on
- Velcro frame hangers
- Paint and brushes, or you can use spray paint
- Zip ties or small nails to attach the aluminum sheets in the frame
Steps:
- Cut the trimming and glue it around the plank for the shelves, you can overlap and zip tie the edges of the aluminum
- Place the aluminum in the frame and secure with small nails
- Place the Velcro strips at the back of the frame, follow the easy instructions
- Lay the board down on a surface and place all the parts (frame, shelves, and curtain rod) where you want them
- Use a pencil to mark where everything is placed
- Drill and screw brackets to shelves and curtain rods, and shelves and curtain rods to the board
- Mark where frame must go and apply contrasting Velcro strips to the board, attach frame
- Find a permanent place for your new jewellery board and prop it up securely
How to Make a Thread Rack As A Jewellery Organizer
Never knew that this existed, but there is a gadget called a thread rack, which people who are enthusiastic sewers use to arrange their thread spools on. This stood out as a brilliant idea for a hanging jewellery organizer.
It is an inexpensive piece of equipment that is ready to be used, get some picture frame hangers or double-sided tape and you can hang it inside your closet or on your wall. If you want to go a step further you can paint it a lovely complementing color, to enhance the décor of your room.
How to Make A Drawer Jewellery Organizer
I saw this amazing product, and could not wait to share it. This is called an accessory tray that you place inside a drawer to organize your jewellery and similarly, other accessories. You should easily be able to find one of these from most convenience stores, or online. The accessory tray also gave me a DIY idea, by placing together different jewellery boxes in your drawer, to create a comparable result.

DIY Drawer Jewellery Organizer
Which brings me to another one of my favorite DIY drawer, Jewellery arranger ideas.
Bowls, bowls, gorgeous colorful, modern, vintage, glass or plastic bowls! Find a few that strike your fancy and neatly fit them into your drawer. Easy to store and arrange your jewellery, even if you are in a hurry.
How to Make A Peg Board As A Jewellery Organizer
What You Will Need:
- Peg Board
- One inch wide backboard.
- Screw Driver and screws or Nail Gun
- Paint
- Tacks
- Hardware to hang your pegboard, or a picture frame hanger and nai
- Old frame
- Chicken wire to fit inside the frame
- Cleaned empty soup cans with the lid completely off and sharp edges removed
Steps:
- Attach the backboard to the pegboard as a frame, making sure all corners are covered, use a nail gun or screw them together
- Paint the pegboard and backboards and attach
- Attach your frame hanging hardware to the back of the board
- Poke some holes at the top part of the soup cans to hang them, and decorate them as you desire
- Paint the picture frame, and cut the chicken wire to fit inside the frame
- Attach the chicken wire to the back of the frame with some tacks
- Use the Pegs that come with your Peg board and attach them where you prefer to hang your soup cans and jewellery
How to Make A Over-door Hanger Jewellery Organizer
Another fantastic idea that is both affordable and clever is to use and over the door, or wall organizer, typically meant for belts and hats, as a jewellery organizer.
You can purchase one that hangs over your closet, or bedroom door, or that can be easily mounted on your wall. Henceforth, you could also paint or decorate it, in any color or design that you wish!
DIY Wall Hanger Jewellery Organizer
What You Will Need:
- Three basic wooden dowels cut to the same
- Cup hooks in a color you like, generally white or gold is obtainable
- Thin Rod
- Paint and decorative materials to decorate the wood
- Painter’s tape, pencil, Drill, sanding block
- Command hooks to hang the dowels
Steps
- Cut your dowels to the desired length, and off the edges and paint their base color, leave to dry
- Stain or decorate your boards and rod with your chosen materials, allow to dry
- Use a pencil to mark the distances apart that you want your hooks to be
- Drill the small holes
- Twist in the hooks
- Use a hanging rod between two hooks
- You can use your hanging hardware or command strips to mount the dowels on your wall
I hope you found these tips as helpful as I did; these are only a few of the many charming ideas for organizing and keeping your jewellery neat and safe.
Statement Necklaces
-
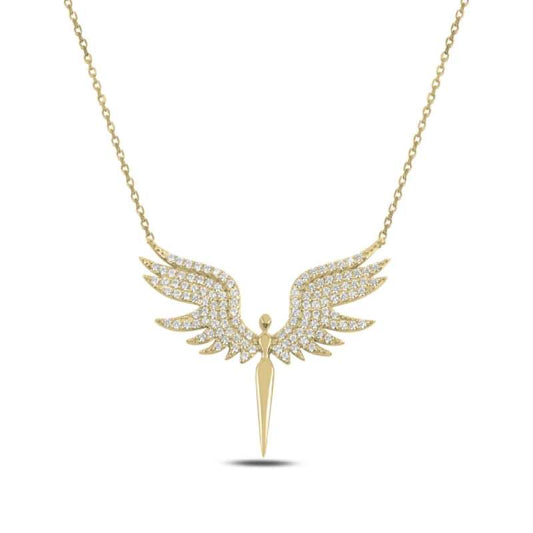
Golden Angel Pendant Necklace
Regular price $47.99 USDRegular priceUnit price per$106.00 USDSale price $47.99 USDSale -
French Yarrow Flower Pendant Necklace
Regular price $67.99 USDRegular priceUnit price per -
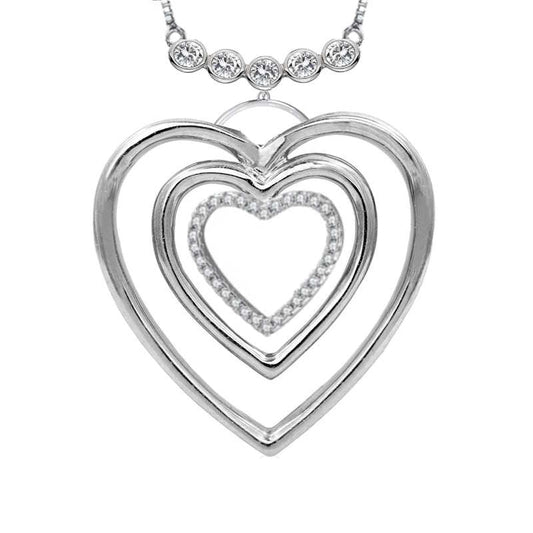
Sterling Silver Three Heart Necklace with Cubic Zirconia | 3 Heart Pendant
Regular price $67.99 USDRegular priceUnit price per$85.00 USDSale price $67.99 USDSale -
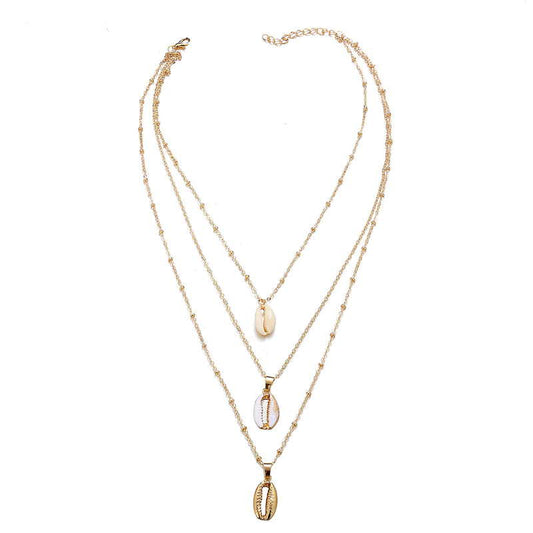
Layered Seashell Necklace
Regular price $39.99 USDRegular priceUnit price per$60.00 USDSale price $39.99 USDSale